Easy No-Knead Buttermilk Rolls: Your Holiday Prep Secret Weapon
Imagine the irresistible aroma of freshly baked bread wafting through your home, even amidst the holiday hustle and bustle. Now imagine achieving that without hours of kneading or last-minute panic. Welcome to the world of
Easy No-Knead Buttermilk Rolls – a culinary marvel that promises soft, squishy, slightly sweet perfection with minimal effort, offering unparalleled flexibility to bake them tonight or prepare them for tomorrow's feast. These delightful pull-apart rolls are not just a side dish; they're an experience, reminiscent of classic Parker House rolls in their comforting texture and taste, making them a festive addition to any Thanksgiving table or holiday gathering.
The beauty of this recipe lies in its simplicity and adaptability, making it the ultimate tool for stress-free entertaining. Whether you're a seasoned baker or a kitchen novice, these rolls empower you to create homemade bread that will undoubtedly impress, leaving everyone raving and asking for more. And the best part? We'll guide you through the precise flexibility of preparing your
no knead buttermilk pull apart rolls overnight or not, ensuring they fit seamlessly into your schedule.
The Magic of No-Knead: Simplicity Meets Deliciousness
The term "no-knead" might sound too good to be true, especially when associated with light, airy bread. However, it's a revolutionary technique that leverages time and hydration instead of intense physical labor to develop gluten. Instead of kneading, you simply mix the ingredients until combined, and then let time do the heavy lifting. This approach transforms bread-making from a daunting task into a simple, almost meditative process.
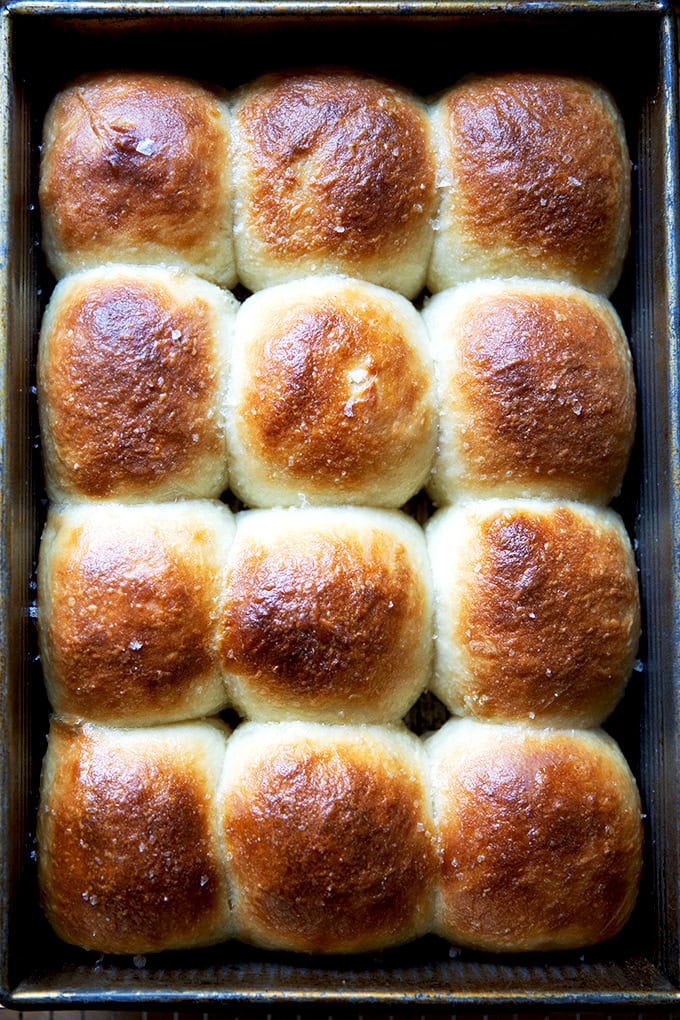
These particular buttermilk rolls are a testament to the no-knead philosophy. From the moment you pull one apart, you'll be greeted with a pillowy softness and a delicate sweetness that makes them utterly irresistible. The addition of buttermilk contributes to their tender crumb and a subtle tang that perfectly balances the sweetness, elevating their flavor profile beyond ordinary dinner rolls. They're designed to be pulled apart, making them a fun and interactive bread for family and friends, particularly enjoyed by children who delight in tearing off their own piece. The texture is so inviting – soft, squishy, and springy – making them the ideal accompaniment to gravies, stews, or simply enjoyed on their own with a smear of butter. This is truly
Buttermilk Pull-Apart Rolls: Soft, Squishy, No-Knead Perfection personified.
Your Holiday Prep Secret Weapon: Make-Ahead Options Explained
One of the most significant advantages of this no-knead buttermilk rolls recipe, especially during the busy holiday season, is its incredible flexibility regarding timing. The central question often asked is, "Can I make these
no knead buttermilk pull apart rolls overnight or not?" The answer is a resounding *yes*, and understanding your options can completely transform your holiday meal preparation.
**Option 1: Prepare the Dough Ahead of Time (Overnight Fermentation)**
You can mix the dough a day in advance and let it undergo its first rise slowly in the refrigerator overnight. This method deepens the flavor of the bread, resulting in a more complex and nuanced taste.
* **Process:** After mixing the ingredients until a sticky dough forms, cover the bowl tightly and stash it in the fridge.
* **Benefits:** This is perfect if you want to get the messiest part of bread making done well in advance. The slow, cold fermentation also contributes to a superior texture and flavor. The next day, simply remove the dough, let it warm up slightly at room temperature (about 30-60 minutes), shape the rolls, and proceed with the second rise and baking.
**Option 2: Shape the Rolls Ahead of Time (Refrigerate Shaped Rolls)**
For maximum convenience on baking day, you can shape the rolls and place them in the baking pan the day before.
* **Process:** Mix the dough, let it complete its initial 2-hour rise at room temperature, then turn it out, divide, and shape the rolls. Arrange them in your greased baking dish, cover the pan, and refrigerate overnight.
* **Benefits:** This option means that on the day of your gathering, all that's left to do is remove the pan from the fridge, allow the rolls to proof at room temperature for an hour or so (until noticeably puffy), and then bake. This is the ultimate "bake and serve" solution, minimizing active kitchen time when guests are arriving or other dishes demand attention. This method directly addresses the core query about preparing your
No-Knead Buttermilk Pull-Apart Rolls: Bake Tonight or Tomorrow? allowing you to choose what suits your schedule best.
**Option 3: Bake on the Same Day (Immediate Baking)**
If spontaneity calls, or if you simply prefer freshly baked rolls with less foresight, these rolls can absolutely be made and baked on the same day.
* **Process:** Mix the dough, allow it to complete its initial 2-hour rise, then shape the rolls and place them in the baking dish. Cover and let them rise at room temperature for 25-35 minutes until puffy. Preheat your oven and bake immediately.
* **Benefits:** This is perfect for impromptu dinners or when you decide you simply *must* have fresh rolls without extensive planning. The result is still wonderfully soft and delicious, just with a slightly less developed flavor profile compared to their overnight counterparts.
Crafting Your Perfect No-Knead Buttermilk Rolls: A Step-by-Step Guide
Making these rolls is surprisingly straightforward, even with the flexibility of the make-ahead options. Here's a breakdown of the process, expanding on the core steps:
1. **Prepare the Dry Ingredients:** In a large mixing bowl, whisk together your all-purpose flour, granulated sugar (which aids in browning and provides that delicate sweetness), salt, and instant yeast. Ensuring these are well combined sets the stage for even distribution.
2. **Combine Wet Ingredients:** In a separate container, pour boiling water over buttermilk. This step is crucial; the hot water warms the buttermilk to an ideal temperature, activating the yeast without scalding it. Let this mixture stand for about 10 minutes. It should be warm to the touch, not hot.
3. **Mix the Dough:** Add the buttermilk mixture and 4 tablespoons of melted butter to your dry ingredients. Using a sturdy spoon or a Danish dough whisk, mix until a cohesive, sticky dough forms. Avoid overmixing; just ensure no dry streaks of flour remain. Remember, *sticky* is good and expected for no-knead doughs!
4. **First Rise (Bulk Fermentation):** Cover the bowl with plastic wrap or a clean kitchen towel and let the dough rise in a warm, draft-free place for about 2 hours, or until it has visibly doubled in size. This rise allows the yeast to work its magic, developing flavor and texture.
5. **Prepare for Shaping:** Lightly grease a 9x13-inch baking dish. Lightly flour your work surface; just enough to prevent sticking without incorporating too much extra flour into the dough.
6. **Shape the Rolls:** Gently turn the risen dough out onto your floured surface. Using a bench scraper or a sharp knife, divide the dough into 12 larger rolls for a more substantial bite, or 24 smaller, more delicate rolls. Roll each piece into a smooth ball. Don't worry about perfection; rustic charm is part of their appeal.
7. **Second Rise / Refrigeration:**
* **For Same-Day Baking:** Place the shaped dough balls into the prepared pan, spacing them relatively evenly. Cover the pan and let them rise at room temperature for 25-35 minutes until puffy.
* **For Overnight Baking:** Place the shaped dough balls into the prepared pan, spacing them. Cover the pan tightly with plastic wrap or foil and refrigerate overnight (up to 18 hours). On baking day, remove the pan from the fridge at least 1 to 1.5 hours before baking to allow the rolls to come to room temperature and proof slightly. They won't double in size like the first rise, but they should feel noticeably softer and puffier.
8. **Bake to Golden Perfection:** Preheat your oven to 400ºF (200ºC). Bake the rolls for 20-25 minutes. They are ready when they are beautifully golden brown on top and cooked through.
9. **Finishing Touches:** Immediately upon removing from the oven, brush the warm rolls generously with the remaining melted butter. For an extra touch of gourmet elegance and a delightful textural contrast, sprinkle with flaky sea salt. Serve warm and watch them disappear!
Troubleshooting & Expert Tips for Flawless Rolls
Even with a no-knead recipe, a few insights can ensure your rolls are consistently perfect:
* **Yeast Viability:** Always check your yeast! If you're unsure if it's active, mix a teaspoon of yeast with a pinch of sugar in 1/4 cup warm (not hot) water. If it foams within 5-10 minutes, it's good to go.
* **Temperature Matters:** The temperature of your buttermilk/water mixture is critical. Too hot, and it kills the yeast; too cold, and it inhibits its activity. Aim for bathwater warm (around 105-115°F or 40-46°C). The boiling water over cold buttermilk method in the recipe aims to achieve this ideal temperature.
* **Measure Flour Accurately:** Bread baking is a science. For best results, weigh your flour with a kitchen scale. If you don't have one, spoon the flour into your measuring cup and then level it off with a straight edge; don't scoop directly from the bag, as this compacts the flour and results in too much.
* **Embrace Stickiness:** No-knead doughs are inherently sticky. Resist the urge to add too much extra flour during mixing or shaping, as this will make your rolls dense and dry. A lightly floured surface and hands are usually sufficient for shaping.
* **Even Baking:** Ovens can have hot spots. If you notice one side of your rolls browning faster, rotate the pan halfway through baking for a more even golden finish.
* **Serving Suggestions:** While divine on their own, these rolls are incredible alongside holiday roasts, hearty stews, or even as a base for mini sandwiches the next day. A dab of honey butter or a sprinkle of fresh herbs can also elevate them.
Conclusion
The journey to making these soft, squishy, slightly sweet
No-Knead Buttermilk Pull-Apart Rolls is truly a delightful one, promising homemade bread with minimal fuss. Whether you opt for the convenience of preparing your dough or shaped rolls ahead of time for that perfect overnight rise, or decide to bake them on the same day for immediate gratification, the results will be consistently delicious. Their uncanny resemblance to Parker House rolls, combined with the ease of the no-knead method, makes them an indispensable recipe for any home baker, especially when holiday prep calls for clever shortcuts. So go ahead, embrace the simplicity, and prepare to impress everyone with these festive, comforting rolls that truly make holiday entertaining a breeze.